
Our garden has been evolving for years. When we moved here, the former owners left us with long skinny garden beds. They were positively infested with kikuyu grass, which has led to the garden we ultimately created.
I wanted beds that were big enough to grow us a good crop of anything, and to keep the kikuyu out. So we laid down some thick sheets of black polythene plastic. We've been working in sections to eradicate the grass, and develop our beds and paths ever since.
The garden is still growing. We added a bed this year and I have plans for at least another 2 beds before we run out of room.
But I've always struggled to represent that visually. Numbering the beds is a bit useless when you're tacking on new ones in random spots each year.
And programs like MS Word or even Photoshop created something that was just... very blah. Functional, but not very attractive or easily maintained.
Enter GardenBox 3D
It's a struggle I also face in other parts of the property. Long-time followers will know that any great plan of mine starts with a doodle, for which I am probably the only person who sees the vision.


A couple of examples of the landscaping plans I design for myself when left to my own resources and devices.
Frankly, I've needed a decent landscape design program for years. So when the AMS Software team got in touch offering a licence to the program GardenBox 3D in exchange for trying it out and writing about it—well—it made a lot of sense to me.
I've got bigger plans in mind, but in order to get my head around the software, I decided to create a plan of my vegetable garden first.
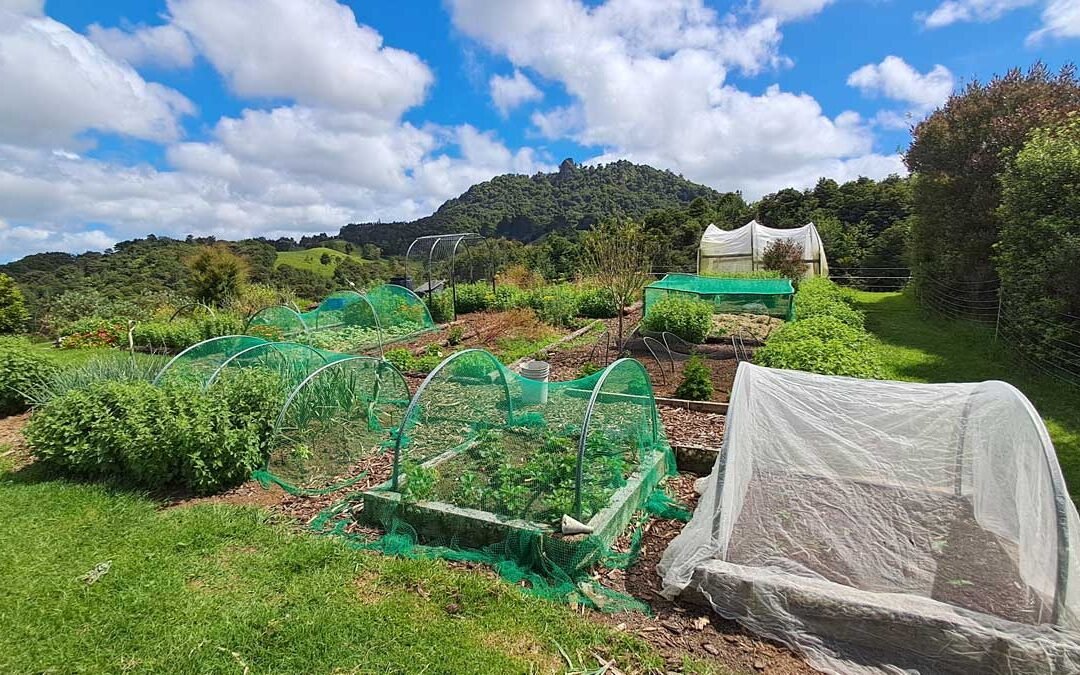
It's mostly flat, and consists primarily of right angles and rectangular beds. But it's also big, evolving, and rotating my crops around the beds means keeping records of what's in there year-to-year would be very helpful.
Measuring the physical area
My garden beds are not equal-sized, and there's been a couple of adjustments lately as I lay ponga border-edging between the beds and paths. So I really needed to start by taking measurements.
GardenBox 3D asks you to start by laying out your 'plot'. Even though my garden isn't a perfect rectangle, that was the easiest place to start, using the width and height of my entire plot + 2 meters to give a bit of space around the edges, 17m x 17m all up.
I was happy to see GardenBox 3D lets you choose between metric measurements (metres) and imperial (feet), so whatever works for you.

I already have a pretty good survey kit. A couple of long measuring tapes, smaller measuring tapes, pegs, string-lines, a clipboard... nothing fancy, but everything I needed.
Starting with a roughly-drawn plan on a piece of paper, I filled out the measurements of each bed and path by hand to take back to the computer.
Drawing the plan in GardenBox 3D
With my plot in place, I could easily place in my garden beds and paths to scale. The software tells you (in your desired measurement) how 'big' each square or how 'long' each line is.
In fact, the physical measuring of my beds took longer than plotting them into the software!
There are a lot of pre-loaded textures and structures in the library of the full-version GardenBox 3D, but they don't include bark mulch. So my paths are bit of a bland-plain brown. But I could add some version of the garden arch I built last year (the virtual one is much prettier). The bug net house is there too.

Weirdly, there were no compost bins in the library of things I could plop in there. Perhaps more expectedly, I also couldn't add the 50+ catnip plants in my garden.
This is hardly the first time I've made a plan of my garden. Here's a couple: on the left is one I posted in 2020. On the right, one from earlier this year in 2025.


And here's the 3D render of my garden from GardenBox 3D.

Once I had everything in place, I called this the "Garden-Master". It will be the file I update whenever we add a new bed or feature to the garden.
Planning my garden with GardenBox 3D
I used the text labelling feature to show where I'm planning to grow each crop this year.
For some crops—strawberries and sunflowers, for example—the software had templates so I could put in the 3D version, which was really quite cool. Unfortunately, this mostly seems to cater for more landscaping and fruiting plants. Vegetables and herbs are an overlooked category which could be expanded.
By saving "Garden-Summer-2025", I have a record of what went in each bed. That means in the future I can rotate my crops around a little.


The 2D and 3D versions of my summer garden plan.
While I don't think crop rotation is absolutely essential for the home gardener, I do try—for example—to not plant my garlic in beds it's experienced a heavy rust infection in previously.
Now that I've been here for a few years, I'm finding the growing seasons are blending together a little. It's a huge help during the planning of each season's garden to be able to flick back to a record.
Testing ideas
There are so many things I've considered trying in my garden, but for one reason or another, have not implemented.
So I saved a new copy of "Garden-Master" and called it "Garden-Sandbox". In my sandbox, I can have all my ideas.
This is when I really started to run into problems. There were no compost bins or birdbaths to add. My line of sugarcane was impossible as sugarcane wasn't an option to insert.
I am able to import files to insert my own. This may be something I play with more over the winter, but as we head into summer I find myself too busy actually gardening to want to investigate more.
One thing I did manage to add was a completely impractical fence that in my dreams, keeps the chickens out.

My biggest issue with the software arose here. GardenBox 3D places shadows on 3D objects, which is great. It has a feature which allows you to see what it would look like at different times of day—a feature I was hoping would be helpful.
Unfortunately the shadows are all programmed for the Northern Hemisphere, which means they all fall in the wrong direction for anyone living south of the equator.
My overall thoughts on GardenBox 3D
You can expect to see more GardenBox 3D renderings in upcoming posts. This makes it so much easier to envision the projects in my head. I can test ideas before I get the spades out. It's an incredible upgrade from my previous methods.
I've started simple here because I don't like complicated projects when learning a new software. I'm yet to really play with slopes and elevation tools (even though there is a mild slope in our garden, I haven't fully realised it here). But I found it easy enough to get my head around, and I'm already thinking of more ambitious ways to work with it.
GardenBox 3D is not a cloud-service—the software and all your plans live on your computer. The premium version is a one-time fee, not a subscription. Old-school styles. That really appealed to me too.
I've got a formal landscaping qualification and while I love the fact I can design professional plans by manually hand, I always wished there was an accessible design program that could give me a few shortcuts. Something that allowed me to play with ideas before I committed them to the page. GardenBox 3D does that.
It's not perfect—that shadow thing isn't a minor problem for me, and I'd love to see more plant and amenity templates included in the software.

READ NEXT
Upgrading the garden paths
The garden is important, but what if the paths between the beds can also contribute to the health of the garden as a whole?
Related content: crop rotation · garden · garden beds · garden design · garden map · garden planning · GardenBox 3D · horticulture · landscape design · product review · review · software · The Outpost · tools

I love the idea of a property layout, mine consist of Google maps images with my notes on. But as we add trees etc, it would be fantastic to have something update able.
Thank you for sharing your thoughts, this may be a new adventure or should I say winter project.
I’ve been using Garden Planner for a few years and while it is missing a few plants it does have a ton of veg and you can update to include your own varieties which is great for us southerners and you can set your hemisphere too. Each year I make a copy for the next year and then update that, and it remembers where you planted things from last year to alert you to a need to rotate a crop. It has compost bins 6 kinds, obelisk, compass, garden arch and water butt though no bird bath
Its called Grow veg au