
The humble sweet potato was an important food in traditional Māori culture. It was brought here in waka from Hawaiki with the ancestors of modern Iwi. Its ability to grow (at least in some areas) in New Zealand, carbohydrate content, and its storage potential made it a staple food source prior to colonisation.
As such, when I've researched and learned about growing kūmara, I've listened mostly to Māori voices. More than anyone (but especially me), they know how to grow kūmara in New Zealand.
So before I get on with today's yarn, I want to especially acknowledge Nick Roskruge at Tahuri Whenua for the information he's worked to collect and publish over the years. If you can find them, his books are incredibly informative and highly recommended reading.
There's also a pretty great archive of interviews about his work at Radio New Zealand.
Too many potatoes
I've really enjoyed my life of stuffing myself full of potatoes in every form for 40+ years. I have no regrets.
But my years and those potatoes are catching up with me. This year I learned that too many potatoes could potentially leave me blind, or lead to an amputated toe, or foot. And to be frank, I'm hoping to die at a well-earned age with all my faculties and phalanges intact.
So I am massively reducing our annual crop of potatoes (thankfully, I am still allowed some potato). Instead, I have turned to kūmara. Never really my favourite, but lower in carbohydrate and higher in fibre than my spuds. I have attained an age where that matters more, and needs to be considered if one wants many years to be ahead of them.
I haven't grown kūmara since 2018, when I grew one bigger than my own head in sandy coastal soils. Kūmara require a certain level of organisation, and I guess it had never mattered enough to stay on top of it until now.
Growing my tipu
A couple of years ago I was served or sent a video on Instagram showing how the creator grew their kūmara tipu. It was genius enough that while I didn't manage to save the video to acknowledge that creator specifically, I remembered it. And it did grow us a batch of splendid tipu this year.
Tipu are the starting point for growing kūmara. You don't plant the tuber as you would for potatoes. You grow a vine grown from a tuber.
I began by selecting an absolute whopper of a beautiful kūmara in my local supermarket. Some time around August, I half-filled a pot with potting mix, placed my kūmara on top, and then filled around the edges with more potting mix. This left half the kūmara peeking out of the soil. I watered it, and left it in a warm, sunny spot.

Within a few weeks it had begun sprouting. Richard took a keen interest in its care at that point, carefully popping it out on the deck for sun during the day and bringing it inside at night. He made sure it was happy, and it absolutely thrived under his care.
Māra kūmara
'Māra' is the Māori word for 'garden'. Having weeded and bordered the assigned garden bed with ponga logs, I got to work digging three trenches, and building two mounds of soil between them.
Somewhere along the way I'd been told kūmara grow in mounds, so I spent some time digging them. Per usual in my garden they run along the contour of the slope in an additional attempt to retain a bit more moisture in the soil. That was the easy bit.

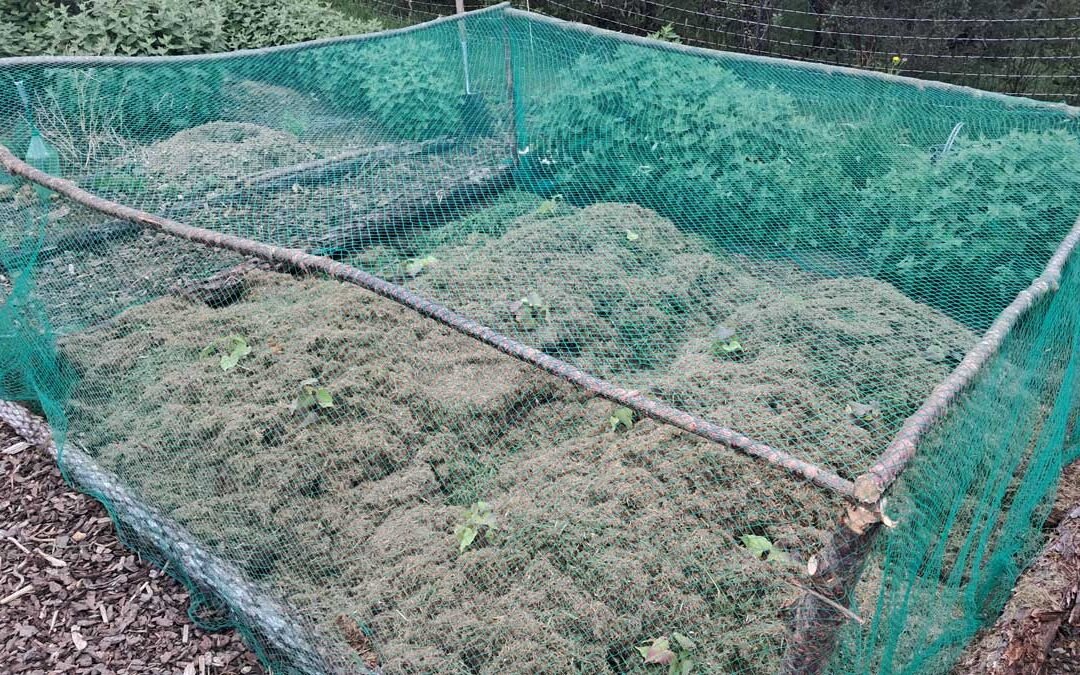
Our local garden terrorists (the chickens) are proving to be an absolute bane. I couldn't expect this garden to do anything at all without protection. Kūmara leaves are tender and delicious, and the chooks love to scatter any kind of mulch at every opportunity.
So I went into the bush and cut down some Taiwan cherry trees to create a frame for a piece of bird net. We used a post hole borer to create deep holes for the vertical posts, and four long screws to hold the support beams in place.
Next up, I wandered around with the lawnmower to pick up enough grass mulch to protect the whole thing. I just dumped it out of the catcher onto my trenches until the entire area was deeply covered.
Planting kūmara
Richard had been wondering for a while how that pot he'd been carefully tending would become kūmara plants. He learned when I tipped out the contents of the pot and began carefully pulling each shoot off the mother tuber.
We got about 18 shoots off the one kūmara. You just carefully pop them off and gently untangle them. You'll be left with rooted shoots, or tipu. That's what you plant into your māra.

I took the best 14. Then I cleared a spot of mulch on the side of the mound; poured about a cup of water on it; used my dibber to make a hole; and planted each tipu into the mound.
I patted it in, then moved onto the next one, planting them on both sides of both mounds.

Then I got to work pinning down (and fixing a few holes) in the bird net. That's it. I am unlikely to touch it again until about April when we harvest them.
Time to wait
The plants have died back and yellowed a little since I planted them—that's normal, at least in my experience. I've seen much more dramatic die-off result in giant tubers. It's about trusting the process from here.
Soon enough (as long as I can keep the chooks away), the plants will settle in and take off. We've had good rainfall and so far, the bird net is holding well.
The frame will likely last at least a year or two if we want to keep it beyond this planting. I like the cherry wood as a structural element, and this bed is difficult to cover with cloches. But these trees are an abundant and invasive resource in the bush, so I think I'll be finding even more uses for them in the future.
In the meantime, nature will do her job and we'll revisit the māra to see what it's provided in a few months.

READ NEXT
The kūmara harvest
The results are in! Check out the harvest of this garden bed, and what we decided to do with it, in the update.
Related content: bird netting · chickens · diabetes · gardening · gardening advice · kūmara · māra kūmara · mātauranga māori · mounding · mulch · planting · ponga · potatoes · propagation · Richard · Tāhuri Whenua · Taiwan cherry · vegetables

I wish you every success. I have a great spot of loose friable soil over a clay pan bottom of a slope with great drainage, that has had cow pats and various manures added over time. I haven’t grown kumara this year but have found crops highly variable in success. This year it’s growing potatoes lol.
Looking forward to seeing your harvest! I grew slips last spring from a leftover Japanese sweet potato from the previous summer. It seemed to be the closest I could come to NZ kumara, which I’m really enjoyed eating when we were in NZ. They grew beautiful big plants, but not much in the way of a harvest. Will try again next year!
Your climate is almost-certainly a little cold. Kūmara can’t be grown everywhere in New Zealand and I am in the warmest part of it. I don’t know the full history off the top of my head, but I believe there’s a link between the Japanese and New Zealand sweet potatoes—and I have heard the US ones are different again (I’ve never had the fortitude to try making any Midwest Thanksgiving sweet potato-marshmallow dishes with our kūmara!)
So if you didn’t do the mounding, try that. Lifting them above the ground should give them a slight lift in soil temperature. Likewise think about how to extend the season and increase the heat, especially at the beginning and end of the season (coverings, early-starts indoors etc). And good luck! It sounds like a fun challenge!!