
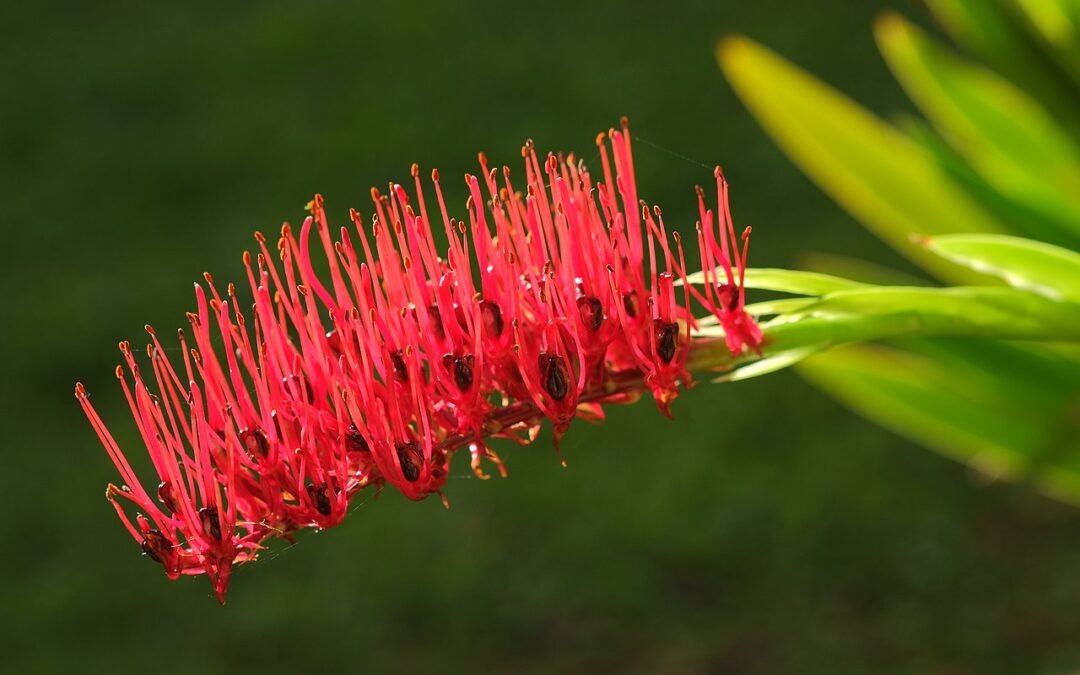
In October last year, my Twitter timeline seemed to be jam-packed with a plant that I just... fell in love with. Poor Knight's Lily (Xeronema callistemon) was in flower all over the country, and it seems I have chosen to follow a lot of people who just really appreciate a nice plant.
I've only learned about these this week because of Twitter, but now I want to have them all over the property. I love them. https://t.co/fZJK02RigU
— Kat 👩🌾 (@katjnz) October 22, 2020
I Googled it. I was delighted to learn it was a New Zealand native. As its name suggests, it's endemic to the Poor Knights and Hen and Chicken Islands near Whangārei. Meaning our climate near the Bay of Islands should be pretty ideal.
Tracking down Xeronema callistemon
Given I work part-time in a garden center, I started by asking my boss about it on my next shift. Apparently we had sold Xeronema callistemon in the past, but hadn't seen it on nursery lists for a couple of years.
It's a slow-growing plant, and even though it is increasingly being propagated - particularly for the civic landscaping projects seen all over my Twitter feed - it takes time to make them ready for sale. 2020 being what it was, not all plants are available to retailers for a lot of Covid-related reasons.
In my searches, I've seen some for sale at Tawapau Nurseries, Wairere Nurseries and Greenleaf Nurseries. But in the end, a co-worker decided to offer me some divisions off her own plants. Just before Christmas, I took her up on that offer.
She had two large pots filled with them. She's a lady who really knows her stuff when it comes to flowers. So she had ensured that her plants were entirely rootbound.
That's how you get these beauties to put out the flowers I had fallen in love with in late spring: you grow them 'til they are practically bursting from the pots.

The challenge
One of her Xeronema callistemon had been in its pot for 18 years! She made me a deal: I get them out of the pots, and return her 2/3s of the bigger one, and I can have the rest.
Deal. Of. The. Century.
I asked Twitter for some ideas on getting it out. There were lots of great suggestions: poking a stick through the hole in the bottom to push it out by the root-ball; running a bread knife or machete around the edge of the pot to loosen roots; soaking it; knocking it with a rubber mallet around the sides; and twisting it manually with a bit of brute force.
If all that failed, there was still the option of using a sledgehammer to break the pot, but this gift was valuable enough and worth the effort. I was hoping we wouldn't need to go that far.
I sourced a rubber mallet from a workshop that won't be needing it over the Christmas break, and we took a crack at it.
Getting them out
For the large plant, we started by running a breadknife around the side. But the knife only went half-way down the pot, and in places was too difficult to avoid the aerial part of the plant.
So we rolled it on its side and tried the poking method. The stick just went into the root-ball.
Then, we got out the rubber mallet and tried gently tapping, while pulling the plant. And that's when we noticed the hair-line crack in the pot.

At that point, we knew we'd lost the pot. So we got out the mallet and smashed it to pieces. The plant was released.
The pot developed a crack so sledgehammer it was. pic.twitter.com/FSwlbsJMhS
— Kat 👩🌾 (@katjnz) December 28, 2020
The second plant went better. We started by soaking it overnight. Then, I ran a bread-knife around the outside of the pot.
We laid the pot on its side. I held onto the plant with my hands, and pushed the pot back with my feet. Richard pulled and wriggled the pot a little and it just... slid right out!

Division
Pulling the large plant apart was the next challenge. The bread knife did a decent job of marking out and finishing, but the hard work was done by a saw blade on a line trimmer.
We took out the piece assigned to us, and placed the rest in a plastic bin to return to its owner, along with a wee ornament the plant had claimed over the years.


Once our chunk was out, it almost divided itself into 6 new plants. It was time to pot up.
Xeronema callistemon's natural environment
When I was researching Poor Knight's Lily, I really went deep, deep down the Google-hole. I learned a few things that informed how I replanted and will care for them.
They only grow in very specific places in their natural environment, and recreating those conditions as much as possible is the key to success.
In the wild, Xeronema callistemon grows on rocky outcrops at high altitudes near coastal environments. They're also found as epiphytes in the branches of pohutukawa. They prefer to have either morning sun or afternoon sun, but not both.
They can be sensitive to extreme light, and handle wind with ease, and tolerate salt. Their roots do well with very little soil. They cannot tolerate frost, and they need perfect drainage.
Their fertilisers come from two places: bird poop, and the ocean. Other than that, they just hold on for dear life in a pretty hostile environment with their tight little root ball, and whatever soil matter they have available.
My soil mix
I spent a few days considering all this. The Plant Conservation Network suggests a mixture of gravel and compost. I wasn't convinced about the compost: I felt it would be too high in nutrients and organic matter. I decided to go with coco coir instead.
The coir will hold water and nutrients I choose to add, without coming with any added pre-mixed fertilisers. It dries out fast without becoming hydrophobic. I really like the Canna blocks - which expand to make 40 litres of coir for $30. It's a finer texture at a better price than other blocks I've tried. I rehydrated it using some guano fertiliser.
I combined the coir with some paving metal we had, as well as a whole lot of rocks we've been picking out of the garden. It's a very rocky mix, with just enough coir to hold some moisture.

The pots
My 6 divisions went into a range of smallish terracotta pots I had hanging about. I selected the pot based on the size of the division. It's better to slowly upgrade the pot over time than to put them in a big pot straight away.
Repotting will be necessary in the future, so rather than spend money on pots that were likely to be smashed in a few years, I used what I had.

Then there was the whole plant I'd been given. I decided to put that one into a single big pot.
Dad had given me some money for Christmas, and a shipment of gorgeous green glazed pots had come into work. The colour is going to look amazing against the flowers.

Terracotta and ceramic pots are the way to go with this one. They more closely mimic the rocky outcrops Poor Knight's Lily naturally grows on.
Plastic will retain too much moisture. It might cost a little more for the pot, but with a plant this fussy, it's worth giving it what it wants.
Care and maintenance
I now have 7 Xeronema callistemon. How do I care for them to ensure they thrive?
They'll be located in rather dry spots. The amount of light they get will be limited. The divisions are in our shadehouse where I can entirely control the water they receive. The large pot is living in a sheltered position near the cabin.
In their natural environment, the Poor Knights Lily is perfectly tolerant of wind and salt water. Most of their fertiliser comes from seaweed and bird droppings. I've found advice for regular feedings of a high nitrogen/phosphate fertiliser, and even a drench with salt water a couple of times a year.
Seaweed fertiliser will be the easiest for most people to source, but a guano-based fertiliser sounds perfect. My local hydroponics store happens to sell those, so I'll be dosing the plants monthly between spring and autumn.
And I'm going to try the salt water - at least on some of them. I'll make sure I use uniodised sea salt at 3.5%.
A happy plant lady
There's nothing quite like finding a plant I really want, it's a feeling I love chasing. The divisions in my greenhouse have darkened up and look quite healthy. I may even be able to spy some new growth starting. It's very exciting.
It'll possibly take years before my plants put out those flowers I fell in love with, but I'll be doing my best to get there.
Header image on this blog via Wikimedia Commons. Public domain image care of user Pseudopanax

READ NEXT
Manual of the New Zealand Flora
Gaining a better understanding of the native plants around us by truly exploring and finally seeing the things that were right in front of us all along.
Related content: containers · dad · drainage · endemic plants · epiphytes · fertiliser · flowers · gardening advice · greenhouse · grow guide · how to · native plants · nitrogen · Poor Knights Lily · pots · propagation · rare plants · Richard · shadehouse · TradeMe · Xeronema callistemon
Stay in touch?
The Kat's Garden newsletter gives readers an extra peek behind the scenes. It's the best way to know when new posts go live, and what's happened since.
If you like what you've seen, join us and see what we learn next.

I have just purchased one of these and have it in a pot on our deck but it doesn’t seem to be enjoying it there. I wonder if our Christchurch climate is not ideal for it. Do you think it would be ok coming indoors over winter?
Hi Georgina. Summer climate in Chch should be OK – if anything, it’s hotter, with longer days there than Northland at the moment. Make sure it only gets direct sunlight for half the day. You’ve also had more rain. How’s the drainage in your pot? If it’s exposed to rain then the soil may be too wet, which is the major thing to watch out for as it can pretty easily lead to root rot. If you can put it somewhere it doesn’t get any rain and just let it dry out for a few weeks/months, you may notice a difference. Tawapou Nurseries (linked in the post) have some recommendations for reversing root rot if this turns out to be the problem. I think it would be worth trying inside or in a greenhouse over winter as they can only take very limited frost.