
There are so many ways to grow food. Each expert you consult will have different ideas, different dos and don'ts. There's different ideologies: organic, synthetic, biodynamic, permaculture, no-dig, companion planting, square foot gardening, moon calendars, and so much more. It can get confusing when you first pick up a spade to grow something. Everyone seems to say something different.
As a result, I've learned to experiment with ideas I hear about. I might not follow them exactly, rather I meld them with other things I've learned and have decided to be true. Sometimes I get stuck into them right away. Sometimes I file their existence into the back of my mind to come back to later.
One technique I've heard about over the years is the concept of 'Square Foot Gardening' (SFG). It maximises garden space by splitting it into squares and then planting inside them. The idea is you can grow a lot of food in a small space with minimal effort. Great idea, right?
Because my garden has been rather large for a rather long time, it's not an idea I've ever experimented with. But when I began thinking about ripping out one of my strawberry beds and transforming it into a salad bed, I ended up turning to Square Foot Gardening.
But why?
Summer here at The Outpost gets really, really hot. And dry. Each year, the garden suffers as I choose to conserve our tank water over irrigating the garden. Sometimes I go out with a watering can, but if I'm honest, that doesn't happen very often.
It means my gardening mojo suffers. Pests take over the garden, plants run away to seed. Any harvests we do get are small and disfigured. It's disheartening. I begin to avoid it. The weeds grow. It's not until winter rolls around and I have to plant the garlic that my motivation returns. By then, it's a huge and overwhelming job.
Not this year.
This year I've decided to use the principles of square foot gardening, apply some technology (and water), and focus on having one bed that really pumps. Hopefully it'll keep me more motivated in the rest of the garden.
Step one: Research
Square Foot Gardening began its public life as a book. I was stoked to find an ebook copy of Square Foot Gardening by Mel Bartholomew in my local library. I read it from cover to cover in a day without leaving the house. Well, I skimmed it.
A lot of the book covers 'general gardening' topics, and I was looking specifically for how to make SFG work for me. So I read the pages I needed to, and flipped through the pages I didn't. But I got the general gist. I wasn't going to go to great lengths to alter the dimensions or soil of my bed, but in theory, the principles should still hold.
The main thing to know is there's a maximum number of plants you can get in each square. How many plants you put in there depends on how big they get. For example, you can have one tomato plant, two cucumber plants, four lettuces, or 16 carrots in a single square-foot.
I decided to grow tomatoes, lettuce, mesclun, carrots, spring onions, basil, coriander, chives, capsicum and cucumber in a single small bed. Normally, these crops would be spread out in larger quantities around the rest of the garden - and possibly still may be. But I specifically wanted one bed I could raid nightly for a fresh salad. The book said this would achieve it, so I decided to dive in.
Step two: Planning
Next, I had to figure out what varieties I'd be planting.
I began with my existing seed collection, and if I didn't have anything suitable, I moved onto the Kings Seeds website. There were 16 'squares' to fill and I ended up filling 9 of them with seeds I already owned.
I particularly focused on small plants with good disease resistance. While I usually try to stay away from F1 varieties because they won't continue to grow themselves, that was a lower priority here. With this bed, I want plants that perform well in limited space.
For tomatoes, I settled on Best Boy Bush F1. It should only grow a meter high while providing full-sized fruit. I'll be growing two plants over two 'squares'.
I lucked out with my cucumber as I already had Spacemaster seeds. I grew them last year and it's a compact but vigorous variety. Perfect for my square foot garden. I'll be growing four plants over two 'squares'.
The previous owner of our property left us a huge collection of seeds when we moved in. As a result, I had a range of lettuce and leafy greens to choose from. So in one square, I'll plant three Royal Oak Leaf and three Tennis Ball lettuces. Then I'll sow another square with Italian Mix Mesclun along with Runway Rocket.
As it happens, I was already in the market for some carrots, so I purchased a pack of Kuroda Improved. These are baby-type carrots suited to the warmer temperatures of Northland. Two squares will be planted with them.
For the basil, coriander, chives, and marigolds, I know I have enough saved seed from previous years to make that work over the five allocated squares.
I was going to grow the spring onions from seed, but then had the opportunity to purchase a bunch of Multiplying Spring Onions from KoruKai Herb Farm. These are a perennial spring onion that should be the last spring onions I ever need to plant. For a lot of reasons they seemed like a good investment.
Finally, the capsicum. I decided this one I would purchase at a large grade when they arrive in stores (probably in October). Peppers I raise from seed never really produce well until the tail end of the season. I want to give mine a head start this year, so I'll be blowing the budget and buying something big for the remaining two squares.
Step three: Set up
Firstly, I had to rip up the old garden. I pulled up all the strawberry plants - hundreds of them. The 25 plants I'd put in last year had gone really hard putting out runners this year. I gave a bucket of plants to a neighbour, and fed the rest to the poultry.

Then I made some adjustments to the soil. In Square Foot Gardening, they really hammer the importance of using a particular mix of soil for success. That's fair if you're building a new bed, but mine already exists, so I'm using what's in it.
That said, I have done a soil test and know what's missing in my soils. I added blood and bone, gypsum, and some superphosphate I had on hand, then topped the bed up with my home made compost. That'll have to do the trick.
Next, I set out my squares. My bed measures 1.4m x 1.8m (or 4.5 ft x 6ft). I'd decided to go for a 4ft x 4ft design which gives me my 16 squares. Except my 'squares' are actually rectangles and bigger than a square foot at 350mm x 450mm. I set up some tent-pegs along the edges and set up nylon stringline to show my squares without biodegrading over time.

In theory, I could fit another 8 squares into this space, but in my heart I am still a gardener that believes plants need more room than one square foot. We'll see how we go this year. Maybe I'll cram more in there next year.
Step four: Layout
Next, it was time to plan the layout. There were two things I was thinking about here: height and companion planting.
The height was important because this garden will be covered with cloche hoops. This will restrict the height of the plants a little, especially on the sides. My hoops are very big, but the tomatoes, cucumbers, and capsicums would prefer more height, while the lettuce, mesclun, herbs, spring onions, and carrots could go on the outside where it's lower.
In terms of companion planting, I've found a book that steers me right regularly, so I've decided to call it my trusted source to avoid the confusion of conflicting opinions. For this project, I used it to help place plants beside their friends (and away from their frenemies) as much as I could.


I used a set of 'cards' and shuffled them around until I had a pattern that worked. It took a while, and a few options, but in the end, I decided to go with this.

Step five: Irrigation and water conservation
Before I began planting, I wanted the bed to have an irrigation system that could feed enough moisture to the bed to keep it healthy, without wasting our precious tank water.
I started my design by drawing out the bed to scale on some graph paper. Setting up irrigation is a bit like playing with Lego freehand. You collect a bunch of pieces and put it together in such a way that it does what you want. When you get to the store, the shelf can be extremely confusing with all the various options. It very much pays to have a plan so that you get the pieces you need.

This is a pretty simple plan. It's designed so I can add on the strawberry bed next door in the future. It also won't take much to be able to add on the beds we haven't built yet on the other side. Longer term, there's a plan to build a rain harvesting system especially for the garden, but we're still working on that one.
After I'd set out my drawing, I dug out my collection of irrigation bits to see what I already had. I didn't have much, but there were some clamps and "goof plugs" that would come in handy.
Then I set out to my local Mitre 10 with a photo of my plan and picked up the rest. It's really hard to overstate how helpful that plan was while I was standing in front of the boxes. If you're setting up your own irrigation, I highly recommend drawing it out first.
It took a couple hours of wrangling, but the bed has a set of drip irrigation that runs between the rows in such a way that each 'square' has access to a water point.

Step six: Planting and patience
My spring onions had arrived a week or so before I got to this point. I'd been keeping them in a glass of water. They went in immediately.
I wanted to sow my seeds directly into the bed. I don't really want to muck around with growing seedlings to transfer. I'm using a lot of knowledge and a bit of money to build this bed, but I don't particularly want to use much effort or time. So I placed a soil thermometer in the bed to help me know when the time is right.
Each of my seeds had an ideal soil temperature to germinate. Right now, the morning soil temperature hovers around 8-9ºC.
When the soil hits 10ºC, I can sow the carrots and lettuce. At 12ºC, I can plant the mesclun and rocket. Chives and coriander can go in at 15ºC. Then the cucumber at 18ºC, followed by the basil, and marigolds once it reaches 20ºC. Because I like to make things complicated, I'll also be planting by our moon calendar, sowing on the next date after the soil is warm enough.
The only exception is going to be the tomatoes. Those I want to give a head start, so I'll be germinating them on a heat pad when they arrive, and growing them to a decent size indoors before planting out in mid-late October.
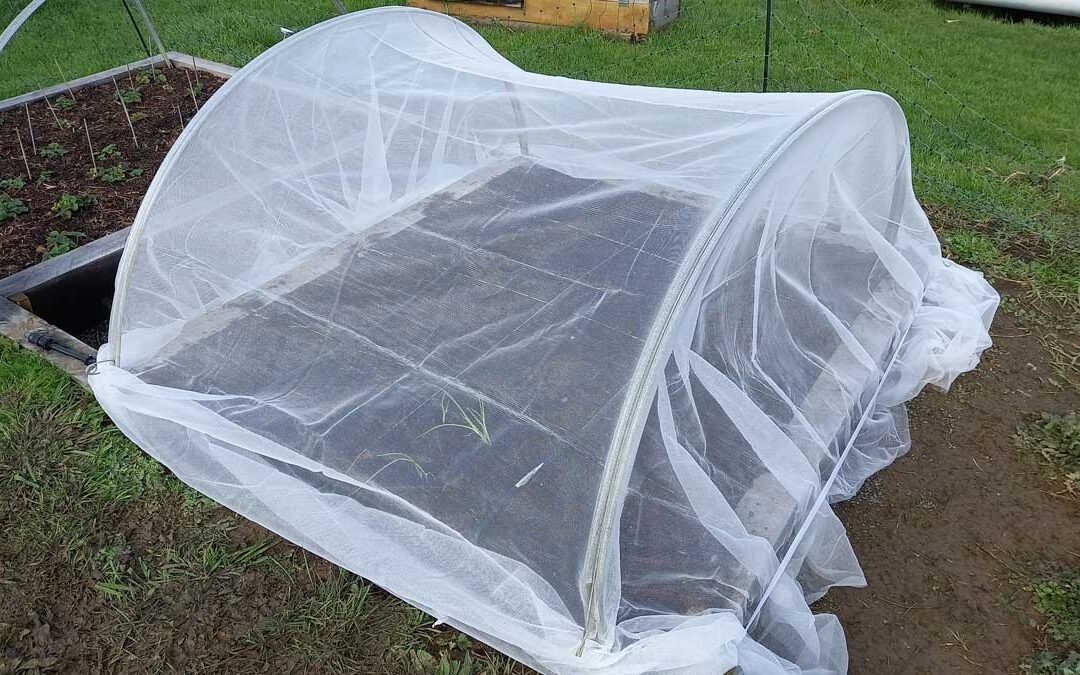
Step eight: protection
Lastly, I covered the bed with BugNet. This is a fine mesh product that keeps bugs out of your garden beds.
I toyed with the idea of using Mikroclima, but for the last two summers we've been utterly slaughtered by army worm and green vegetable bug. This bed is supposed to be the one that prevents me from crying, so it needs protection from our foes more than an improved microclimate. Plus getting a piece of BugNet large enough to fit my bed was a little more convenient.
I think the BugNet will also contribute to a better microclimate - 15% shade would be pretty helpful on the veges in summer.

My cloche hoops come with steel clips to hold the covering. Additionally, I ran a piece of elastic around the outside edges of the bed to hold it down there as well. On the side without a wooden edge and along the path, it's held down with weedmat pins.
And now, we wait
My garden as a whole is in a big holding pattern right now. Beds look empty when they're not. We're waiting for the temperatures to get up a bit, and the days to get a tiny bit longer, and then the whole thing should really just take off.
But for now, we wait. I'll sow my seeds and pull out the weeds and hopefully, in a few months I'll be able to update you with something incredible. But for now, we wait.

READ NEXT
An update on the Square Foot Garden
A mid-season update on the Square Foot Gardening experiment.

READ NEXT
End of season update on the Square Foot Garden
The conclusion of the season of Square Foot Gardening.
Related content: basil · books · bug net · capsicum · carrots · cloche hoops · companion planting · coriander · cucumber · drought · grow guide · herbs · insect netting · irrigation · Kings Seeds · lettuce · marigolds · mesclun · mikroclimba · planning · rocket · seeds · spring onions · square foot garden · strawberries · summer gardening · The Outpost · tomatoes · vegetable garden · water
Stay in touch?
The Kat's Garden newsletter gives readers an extra peek behind the scenes. It's the best way to know when new posts go live, and what's happened since.
If you like what you've seen, join us and see what we learn next.

I love reading your blog Kat. I am going to do a similar plan for my two small raised beds, so you’ve inspired me to get out there and start the prep. Just wondered where you got your cloche from, as my garden was decimated by bugs last summer too?
Oh yay! I’m glad it inspired someone! I inherited them from my grandfather, but I’ve found Redpath selling something similar if not identical. A bit pricy, but they’ll last actual generations.