Healthy soils produce healthier plants with higher yields. They reduce your need for irrigation, inorganic fertilisers, and pesticides.
The first rule for improving your soils organically is that it’s going to take time. Nature always needs time.
The second rule for improving your soils organically is that you’re going to need organic matter. Lots and lots of organic matter.
This week, I’m going to define good soil; work out what kind of soil you have; and talk about some ways you can go about improving it.
What does ‘good soil’ look like?
‘Good soil’ is high in nutrients for plant growth. It is capable of holding moisture, without being boggy. It is well-aerated with plenty of earthworms and organic matter.
It’s dark brown. This indicates that it’s high in organic matter. The darker, the better.
A good soil is half solids – the bits you probably think of when you think of soil – and half water and air. The water and air are both very important for healthy plant growth.
Ideal soil composition
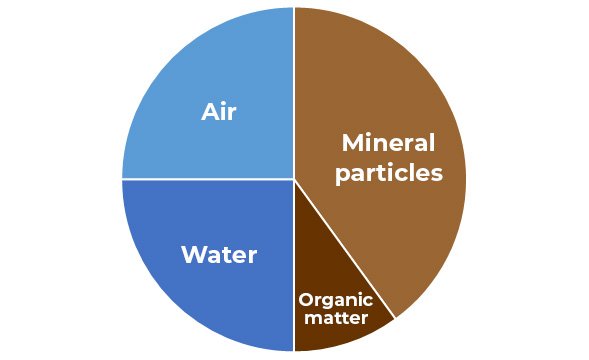
Mineral particles should make up around 40-45% of your soil. They are the underlying rock and minerals that have been ground down through weathering and other processes over millennia. Many of the nutrients required for plant growth are found in the mineral particles of your soil.
The size of your mineral particles determines the kind of soil you have – sandy, silty, or clay soils. This in turn informs the water retention qualities of your soil.
Organic matter should make up another 5-10%. This is the remains of plants and animals, broken down by (and including) bacteria and fungi.
Organic matter provides the balance of nutrients required for plant growth. It binds with your mineral particles and improves the water retention qualities of your soil.
Water will fill the pore spaces between the soil solids and make up about 25-35% of the space. Water is critical for photosynthesis in plants.
Too much water is really a lack of air and leads suffocation of your plants and promotes fungal diseases.
Air (in particular, oxygen) is also required in the root zone for optimal plant growth. Between 15 and 25% of the volume of your soil should be nothing at all!
This is why earthworms are important – they help aerate soils as they move through it. And you know what worms like to eat? Organic matter.
- ARTICLE: Healthy soil: healthy garden (New South Wales Department of Primary Industries)
What is organic matter?
Organic matter is stuff that used to be living, or was made by something that is living.
When your soil is high in organic matter, it will hold more air and water than soils low in organic matter. It will also produce higher yields and healthier crops.
Some examples of organic matter include:
- Grass cuttings – either fresh from your mower or dried in the form of straw or hay
- Manure – from animals, birds, and even humans!
- Leaves and other plant detritus
- Wood and bark in any form
- Food scraps
- Seaweed
- Bones and carcasses of animals or fish
- Compost or worm castings
- Microbes living and breeding in your soils.
As you can see, the term ‘organic matter’ can mean a wide range of things. It can include things you find and collect like seaweed on the beach while walking your dog and coffee grounds from your local cafe; or things you make like grass clippings when you mow the lawn.
That’s great for you because when you begin improving your soils organically, you begin bringing all kinds of ‘rubbish’ home for your garden, worm farm, or compost bin!!
Once added, organic matter becomes part of a cycle in your soil. It is constantly being broken down by bacteria and fungi. Those microbes have their own lifecycle – living, dying, and breaking down again becoming organic matter themselves.
Every layer of organic matter you add will improve your soil – forever!
ARTICLE: Humus is Dead (Long Live Humus) (Spring 2021, Maine Organic Farmers and Gardeners)
Soil types
Your soil type mainly refers to the particle size of the mineral element of your soil. In particular this impacts a soil’s ability to hold both water and air.
Sandy soils
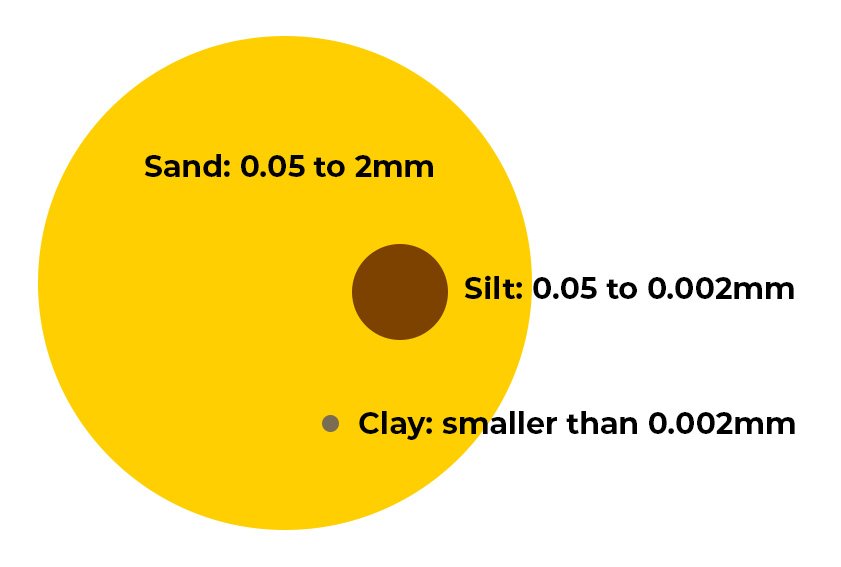
If you have sandy soils then your soil particles will be quite large, measuring between 0.05mm and 2.00mm.
You’ll find your soils are quick-draining and struggle to hold onto water or fertilisers. They will be dry, maybe with too much air and not enough water.
These soils are great for early crops as they warm up early. To improve water retention, you need organic matter. It will act like a sponge and help bind your soil particles together.
Silty soils
If you have silty soils, then your soil particles will measure between 0.05 and 0.002mm.
You’re probably doing OK. Your soil probably has good ratios of water and air.
Adding organic matter is going to super-charge what your soils can do and help grow thriving healthy plants.
Clay soils
If you have clay soils, your soil particles are smaller than 0.002mm.
They are very good at holding onto holding nutrients and water – sometimes too good! They can be prone to waterlogging, compaction (entirely lacking any air), and they’ll take longer to dry out.
Organic matter and gypsum lime can help break them up and improve drainage. More organic matter means more earthworms, who will work to break up and mix your clay soils with the organic matter.
This will help create the air pockets your plant roots need to be able to breathe and improve performance.
Earthworms
Earthworms are an important part of your soil’s ecosystem. They help to break down organic matter, sequester carbon, and improve drainage in your soils.
They eat organic matter, move organic matter, and poop organic matter. They are often one of the first steps in the biodegradation process.
In turn, that helps your plants grow extensive root systems to reach minerals and nutrients for growth. Different types of earthworm live at different depths of soil.
Worms need an optimal amount of moisture. They can die in conditions that are too wet or too dry and will often migrate to a better environment if the one they’re in changes.
The presence of earthworms is often considered a good indicator of a healthy soil.
- ARTICLE: Common New Zealand earthworms (Science Learning Hub)
- ARTICLE: Story: Earthworms (Te Ara Encyclopaedia of New Zealand)
pH
pH is a measure of acidity or alkalinity of a soil. It has a big effect on both your soil and your plant’s health.
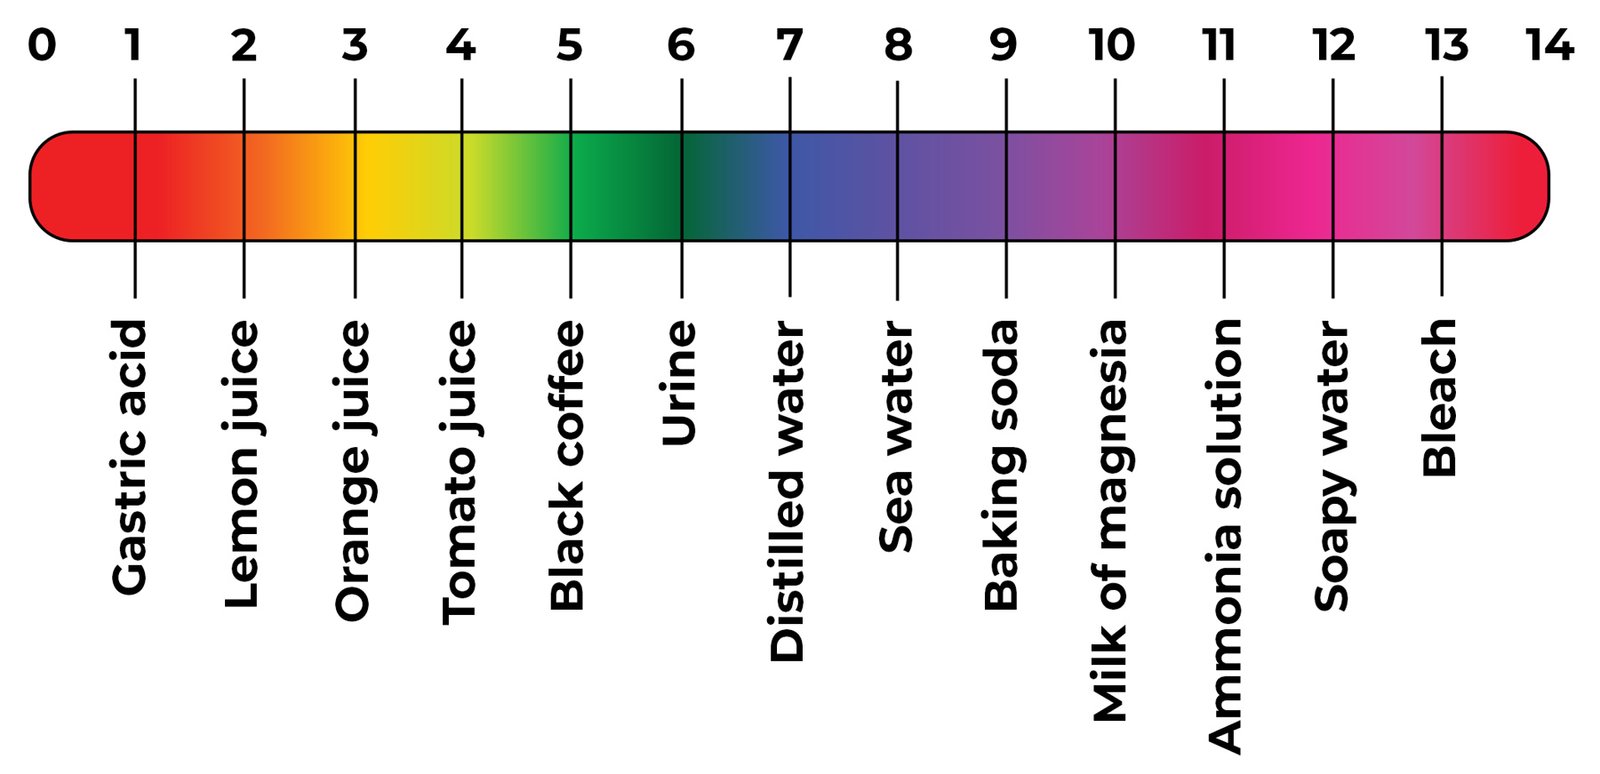
The pH scale runs from 0 to 14. 0 to 7 indicates acidic, and from 7 to 14 indicates alkaline.
Edward Stevens, CC BY 3.0 with edits for this Deep Dive by Kat Jenkins, via Wikimedia Commons
The lower the number, the more acidic it is; while a higher number indicates more alkaline. Most soils sit between 4 and 9.
The optimal zone for most plant growth is 6.0 to 7.0. Though some plants prefer more acidic or more alkaline conditions.
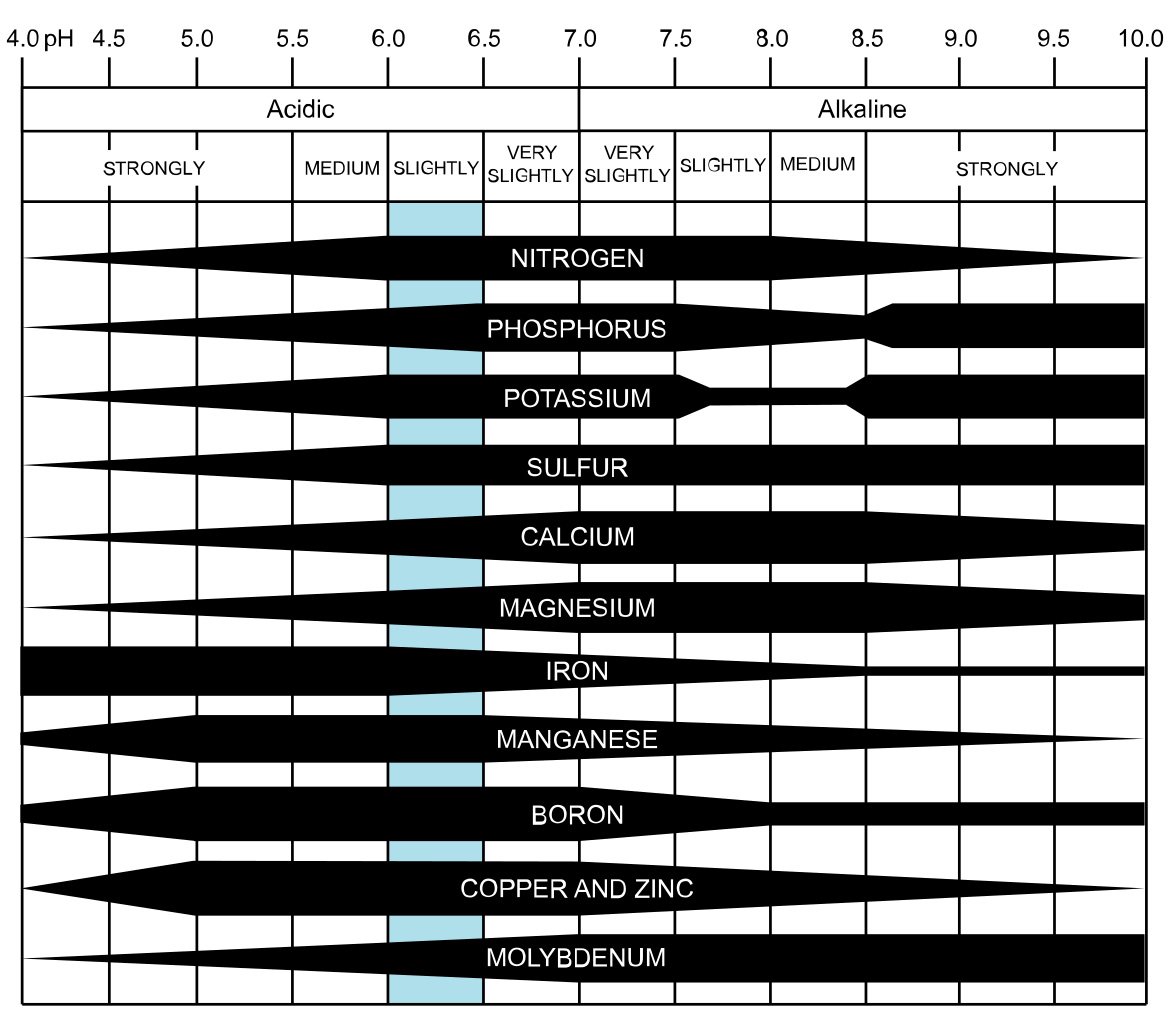
The acidity of your soil can affect the microorganisms that live there as well as your plant’s ability to access nutrients. Sometimes a nutrient can be in your soil, but the general pH restricts your plant from accessing it.
That means you can keep throwing that nutrient on all day, it’s not going to help your plant unless you address the pH first.
For example, the chart below shows that plants can’t access potassium if the pH of the soil sits between 7.6 and 8.4.
The zone where the most nutrients are available to plants is 6.0 to 6.5.
Therefore soil acidity can have a huge affect on your plant’s health.
CoolKoon, CC BY 4.0, via Wikimedia Commons
You can buy pH tests and devices in garden stores; or you can have your soil’s pH measured by a laboratory as part of a soil test.
Increasing pH
If you find your soil is too acidic, adding lime is the most recommended method to increase your soil’s pH.
Not all lime is equal. Gypsum (claybreaker) and garden lime will make your soil more alkaline.
Dolomite lime includes sulphur compounds which means it will not affect the pH of your soil.
Decreasing pH
If you find you have used too much lime in the past – or perhaps are on limestone soils – and your soil is too alkaline, you can make your soil more acidic by adding compost.
Often, keeping a neutral garden soil optimal for plant growth involves a combination of lime and compost.
Do you need a soil test?
Yes and no. Let’s be honest. Soil tests are expensive and not very accessible to a home gardener. Most gardeners can go their entire lives without ever getting a formal test of their soil’s properties.
However, they are interesting and useful if you do go to the effort of getting them. Most importantly, they ensure you’re using amendments your soil actually needs.
I had our garden tested in 2020 before we’d done much to it to get an idea of what to focus on. One thing I learned was that the garden had excess potassium, while lacking almost everything else.
When I began looking at products on the shelf, I discovered that every brand of blood and bone had a slightly different makeup, but that the Tui Blood and Bone was the only brand that didn’t contain potassium (K) with and NPK ratio of 7-4-0.
In practice, that means I’m able to buy the product that best suits my soil’s needs.
Soil is ever-evolving, and soil tests need to be repeated fairly regularly – our garden is about due again.
The most accessible soil test currently available to home gardeners in New Zealand is probably via Seacliffe Organics ($189-$259).
Soil tests you can do at home
You can still learn a lot about your soil without sending samples to laboratories.
Here are four tests you can do to learn more about the health of your garden soil:
- PROJECT: The Great Kiwi Earthworm Survey (AgResearch New Zealand)
Microbes
Microbes – bacteria, fungi, and protozoa – are the unsung heroes of your garden’s soil.
These tiny living things are responsible for the breakdown and recycling of nutrients within your soils. They help hold moisture and transfer nutrients. They form bonds with your plants that improve their performance.
All things are connected – by microbes.
Microbes are the next stage of breaking down organic matter once it has been mixed into your soil by earthworms. They continue to break the organic matter down, and make it available to plants.
Mycorrhizal fungi can form networks with plants to help them access nutrients beyond their own root systems.
Of course, there are ‘good’ microbes – things that help your plants and help them thrive – and there are ‘bad’ microbes – which may introduce or cause diseases like rust, rot, or mildew.
The key is to try and tip the balance in the ‘good’ microbes direction.
To do that you need to ensure your soils are:
- well-aerated
- with plenty of organic matter for them to snack on
- a neutral to slightly acidic pH.
Mulch
Mulch is a blanket of organic matter draped on top of your soil. It prevents ‘bare soil’ from being exposed to the elements.
When soil is covered – either with plants or mulch – it is less prone to erosion by wind and rain. And it helps retain moisture, reducing your need for irrigation.
It acts as a barrier, preventing infection of plants by pathogenic bacteria that live in the soil. It stops weed seeds from germinating too.
Ultimately, today’s mulch is tomorrow’s organic matter in your soil as earthworms and microbes break it down and begin feeding the nutrients it contains back to your plants.
You don’t need to dig your organic matter into your soil – you can apply it regularly as mulch.
- PODCAST: Why Mulch Matters in Every Garden: What You Need to Know (Joe Gardener Podcast, 50 minutes)
Compost and compost teas
Compost is a really basic way of improving the organic matter content of your soil.
If you have a compost pile you’ve been throwing things on for a while, I really recommend you pull off the top layers and see what’s underneath. Your humble compost pile might surprise you.
The topic of composting is a really big one – and worthy of its own Deep Dive – but also so important to improving your soils organically that it needed mentioning.
- PODCAST: Composting Guide A to Z: The Quick and Dirty on Everything Compost (Joe Gardener Podcast, 50 minutes)
Compost teas are made with compost ‘brewed’ in aerated water, often alongside molasses and other organic additives to encourage microbial activity.
Once brewed, the ‘tea’ is strained and sprayed onto crops and soil to inoculate them with beneficial microbes.
- PODCAST – Compost, Compost Tea, and the Soil Food Web with Dr. Elaine Ingham (Joe Gardener Podcast, 50 minutes)
No-till gardening
No-till gardening is deciding not to turn over the soils in your garden. The underlying theory is that by turning over your soil, you are exposing weed seeds to light where they will germinate, and disturbing the biota and structures in the soil.
So by not turning over your soil, you don’t disturb the microbes and earthworms in your soil.
You don’t expose the weed seeds in your garden to light, and so they never germinate. Genius!
When you need to add compost or other organic matter, you just add a layer to the top, cover it with mulch, and let your worms and microbes take care of the rest from there.
- PODCAST: No-dig Gardening, with Charles Dowding: A Convincing Case for Easier, More Productive Results (The Joe Gardener Podcast, 52 minutes)
Cover crops / green manure
Growing green manure allows your garden beds to rest from constantly being ‘productive’. Of course, humans don’t like seeing anything go to waste, so instead of just letting our gardens grow whatever weeds they want for a little while, we like to put in something useful.
Green manures help prevent erosion on soils, especially over winter when heavy rains can cause problems. This is why they are sometimes called ‘cover crops’. Rather than leave beds or paddocks bare, we grow plants that usually provide a few functions, including holding our soils together during harsh rainfalls.
Green manure is growing your own organic matter.
Basically you grow a garden bed or paddock with one, or a variety of plant species that are designed to:
- Fix nitrogen to the soil through their relationships with bacteria in the soil (legumes such as clover, lupins, or broad beans)
- Aerate the soil (carrots, beets, radish)
- Create organic matter for composting (oats, buckwheat)
- ‘Disinfect’ soils of pest problems or contaminants (marigold, mustard, sunflower).
You can plant one, or a mixture of these plants to achieve your goals.
Typically, you plant green manure by direct-sowing or broadcast-sowing seeds. Some seed suppliers will sell bulk-bags of seeds for this purpose.
Your green manure should grow into a lush bed of organic matter pretty quickly. You are not aiming to get to the end of the growing cycle anyway.
When you grow green manure, you are growing bulk – not seed or flowers. Once the plant begins to flower, it’s time to harvest it.
When you notice your green manure beginning to flower, use a slicing tool such as a niwashi knife, scythe, or knife to slice the plants at the base near the roots.
Leave the roots in the ground. Depending on the species you’re growing, it may grow back and provide you with another flush of organic matter. If not, the roots will break down naturally in the soils. This will improve drainage and aeration.
Uses for your organic matter include:
- Mulch – run a lawnmower over it to break it into smaller pieces if this is easier, or just ‘chop and drop’ where it is. Apply as a layer on top of your soil.
- Bury it – farmers typically plough their green manure crops into the soil before planting more productive crops. This is a bit harder to achieve on a home-garden scale, but burying your green manures about 20cm under the surface will mimic it.
- Compost ingredients – add your green manure straight to a compost bin or pile and allow it to break down before applying it to your garden later.
- Worm food – your worm farm will love a layer of green manure! You’ll collect it back as wormcastings in the future.
- Chicken or stock feed – helpful in times of low growth. You can reclaim the green manure in the form of animal manure!
Every bit counts
Each time you add organic matter to your compost heap or your garden, you’re helping your soils.
You’re building networks of earthworms, composting worms, fungi, and bacteria that will take that raw trash material and turn it into a healthy and productive garden.
I hope this guide has given you some ideas on how to make your garden more productive next season.

